You order a set of 8x10 prints from a shot you love, and the prints arrive with both people's shoulders sliced off. Or you upload a perfectly composed headshot to a profile field and the site returns a circle with your chin missing. Neither is a printing fault or a bug. Both are the same problem: the picture you made and the hole you put it in are different shapes.
Aspect ratio is not resolution
Resolution is how many pixels an image contains. Aspect ratio is the proportion between its width and its height, with the pixel count factored out.
1920x1080 and 3840x2160 are both 16:9. So is 1280x720, and so is 7680x4320. Divide width by height in every case and you get 1.778. They differ enormously in resolution, 3840x2160 holds four times the pixels of 1920x1080, and not at all in shape.
This matters because the two failures are fixed differently. If an image is the wrong shape, resizing will not save it; you have to crop, pad, or accept distortion. If an image is the right shape but too small, cropping will not save it; you need a bigger source. Diagnose which one you have before you touch anything.
To get the ratio from a pixel size, divide both numbers by their greatest common divisor. For 4032x3024 the GCD is 1008, giving 4:3.
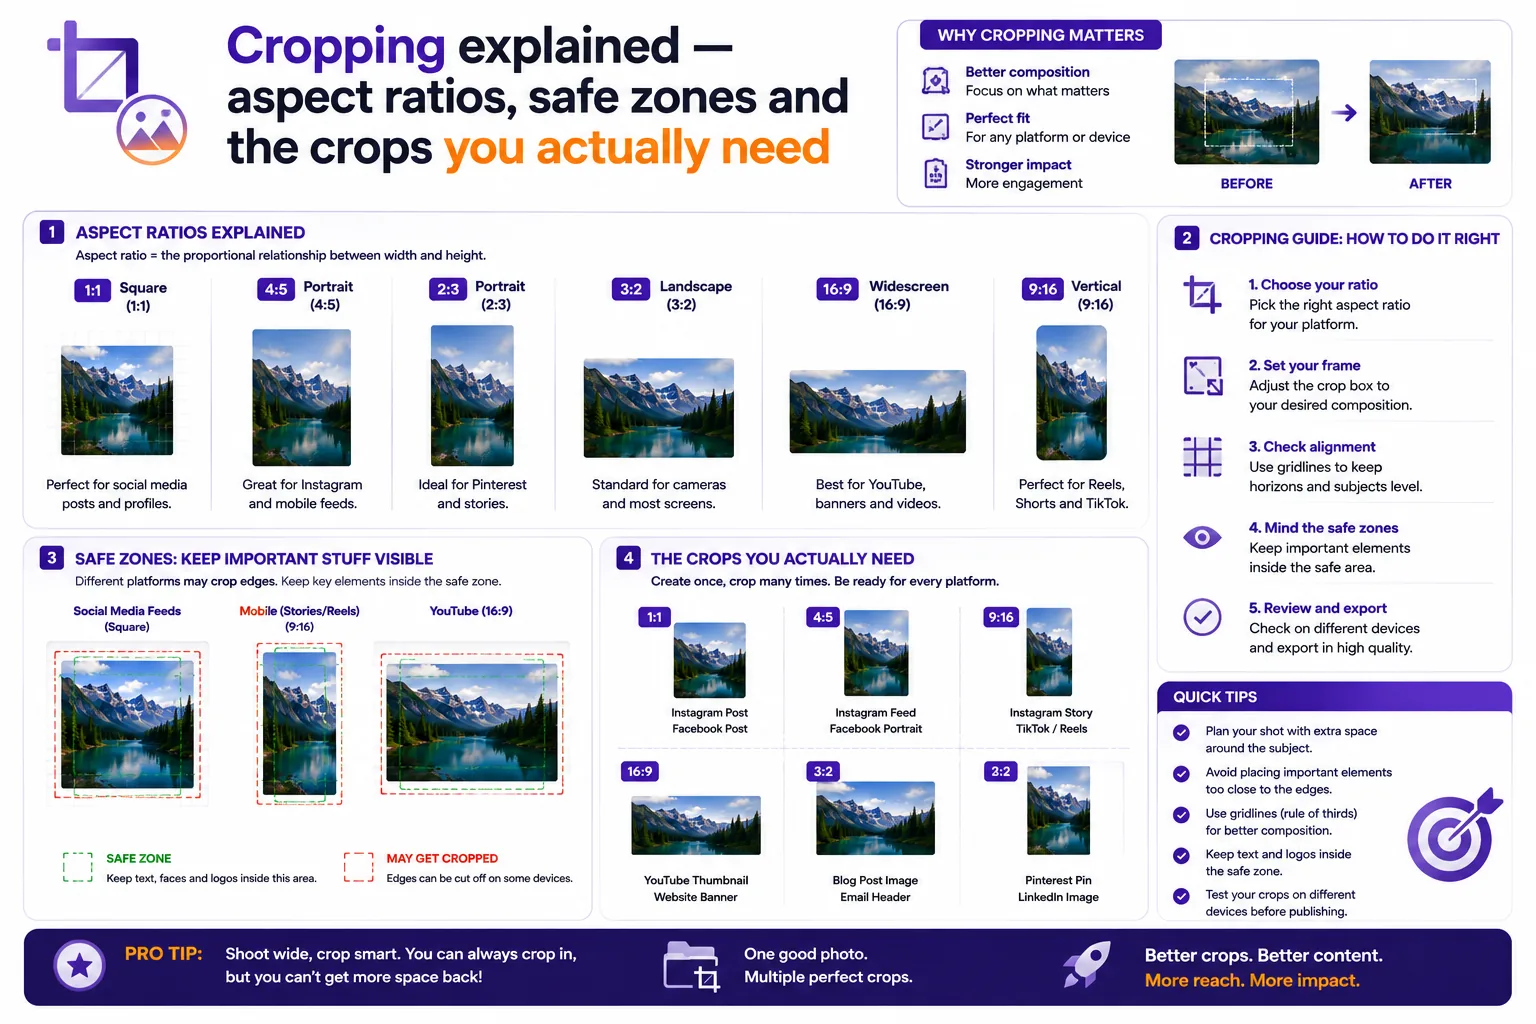
The ratios you will actually meet
| Ratio | Decimal | Where it shows up |
|---|---|---|
| 1:1 | 1.000 | Profile pictures, avatars, marketplace thumbnails, album art |
| 4:5 | 0.800 | Tall social feed posts; also the 8x10 print |
| 3:2 | 1.500 | Most interchangeable-lens cameras; the 4x6 print |
| 2:3 | 0.667 | Portrait orientation of the same; posters and 4x6 verticals |
| 4:3 | 1.333 | Phone main cameras, Micro Four Thirds, older monitors, most slide decks in 4:3 mode |
| 16:9 | 1.778 | Screens, video, YouTube, modern presentation slides |
| 9:16 | 0.563 | Vertical video and full-screen phone stories |
| 2.39:1 | 2.390 | Anamorphic widescreen cinema; wide website hero banners |
Cameras shoot 3:2 because 35mm film frames were 36mm x 24mm, and full-frame digital sensors kept the dimension. Phones and Four Thirds sensors default to 4:3 because that shape uses more of a squarer sensor and fits a phone screen better in portrait.
Prints come from a different lineage; the standard paper sizes were set by what cut economically from a roll. 4x6 is 1.500, which is exactly 3:2, so a 4x6 print of a camera file loses nothing. But 5x7 is 1.400 and 8x10 is 1.250. Neither matches 3:2, so both crop. That single mismatch is the cause of most "the lab cut my photo" complaints.
Three ways to change shape, and when each is right
| Method | What it does | Cost | Use when |
|---|---|---|---|
| Crop | Discards pixels outside the new frame | Loses content and total resolution | The subject has margin around it and the edges are expendable |
| Resize (non-uniform) | Stretches or squashes to fit | Distorts everything | Almost never for photos; only for abstract textures |
| Pad / letterbox | Keeps the whole image, adds bars | Adds empty space, shrinks the subject in frame | Nothing may be lost: product diagrams, screenshots, artwork, scanned documents |
Non-uniform resizing is the one people reach for by accident, usually by dragging a corner handle with the aspect lock off. Forcing 1920x1080 into a 1080x1080 slot squeezes the width to 56 percent of where it should be. Faces go narrow, circles become ovals, and everyone can see it even if they cannot name it.
Padding is genuinely correct more often than photographers assume. A 3000x2000 product shot placed on a 3000x3000 white canvas gains a 500-pixel band top and bottom, keeps every pixel of the product, and satisfies a marketplace that demands square images.
The arithmetic of a crop
Given a source of W x H and a target ratio of Rw:Rh, work out which dimension runs out first.
- Compute the source ratio, W / H, and the target ratio, Rw / Rh.
- If the source ratio is greater than the target, the source is too wide. Height is the limit: keep H, and set the new width to H x (Rw / Rh).
- If the source ratio is smaller, the source is too tall. Width is the limit: keep W, and set the new height to W x (Rh / Rw).
- Round to whole pixels, then centre the crop box, or offset it deliberately for composition.
Worked from a 6000x4000 file (24 megapixels, 3:2, ratio 1.500):
| Target | Result | Pixels kept |
|---|---|---|
| 4:5 (0.800) | 3200 x 4000 | 53% |
| 16:9 (1.778) | 6000 x 3375 | 84% |
| 1:1 (1.000) | 4000 x 4000 | 67% |
| 9:16 (0.563) | 2250 x 4000 | 38% |
| 2.39:1 | 6000 x 2510 | 63% |
The 4:5 row is also the 8x10 print: you surrender 47 percent of the frame to get one. Knowing that in advance is the whole point of doing the sum.
Shoot loose, then crop outward
If one photograph has to serve a square avatar, a vertical story, a widescreen banner and a print, do not compose it tightly for any of them. Compose for the widest and the tallest crop at once and keep the subject in the region they share.
From the 6000x4000 example, the 9:16 crop is 2250 pixels wide and the 2.39:1 crop is 2510 pixels tall. Overlay both on the centre of the frame and the intersection is a 2250 x 2510 box, about 24 percent of the total area. Anything essential inside that box survives every crop in the table. Anything outside it will be lost by at least one of them.
In practice that means: leave headroom, leave space either side, and let the framing look slightly loose in the master file. Then produce each output by cropping outward from the safe zone rather than trying to rescue a tight original. When you get to the actual crops, a browser-based image cropper with fixed-ratio presets is faster and more repeatable than dragging by eye in a desktop editor, because the ratio is locked and you only choose the position.
Headshots and profile pictures
Two rules do most of the work.
- Eye line about a third down from the top. Not centred. A face with the eyes in the vertical middle of the frame reads as having too much forehead and not enough presence.
- Headroom under control. A small gap above the hair, not a ceiling of empty background. If the top of the head touches the frame edge, it looks cropped by accident.
Then there is the circular crop. Most platforms accept a square upload and mask it to a circle for display. A circle inscribed in a square covers about 79 percent of the square's area, and the missing 21 percent is entirely in the corners. The centre-to-corner distance is about 1.41 times the centre-to-edge distance, so corner content sits well outside the visible disc.
The consequence: build the square, but compose as if the corners do not exist. Keep the head and shoulders inside a centred circle, with roughly 10 percent margin between the subject and the circle's edge, so the crop still works if a different platform masks slightly tighter. Instagram uploads photos at up to 1080x1080 pixels, which is a reasonable square master to work from.
Passport and ID photos
These are the crops where you cannot negotiate, and the specification is different in every country. Two verified examples show how far apart they can be.
| United States | United Kingdom | |
|---|---|---|
| Printed size | 2 x 2 in (51 x 51 mm) | 45 mm high x 35 mm wide |
| Ratio | 1:1 | 7:9 (0.778) |
| Head height | 25-35 mm, chin to top of head | 29-34 mm, chin to crown |
| Digital file | Square, 600x600 to 1200x1200 px, JPEG, sRGB, 240 kB or less for visa images | At least 600 x 750 px, 50 kB to 10 MB |
For US online passport renewal specifically, the State Department accepts JPG, JPEG, PNG, HEIC or HEIF between 54 kB and 10 MB, and if you are scanning an existing print it should be scanned at 300 pixels per inch.
Note what the table shows: a square US photo and a 7:9 UK photo cannot be the same crop of the same file, and the head must occupy a specified physical height in each. Always check the current rules from the issuing authority for the country you are applying to, not a summary. And because an ID photo is a biometric identity document, prefer a tool that does the cropping in your browser rather than uploading the file to a server you do not control.
Before you export
- Note the source pixel dimensions and reduce them to a ratio.
- Decide crop, pad or uniform resize, and rule out non-uniform resize.
- Run the arithmetic for each target ratio so you know what you are giving up.
- Check the smallest output still has enough pixels after the crop.
- Keep the uncropped master. Every future destination will want a different shape.