You uploaded the artwork on Friday afternoon and on Monday morning prepress emailed back: no bleed, RGB images, fonts not embedded, please resupply. The job has lost a day, the deadline has not moved, and nothing in that email explains which export box you were supposed to tick.
Almost every rejection comes from the same short list of settings. Here is that list, with numbers.
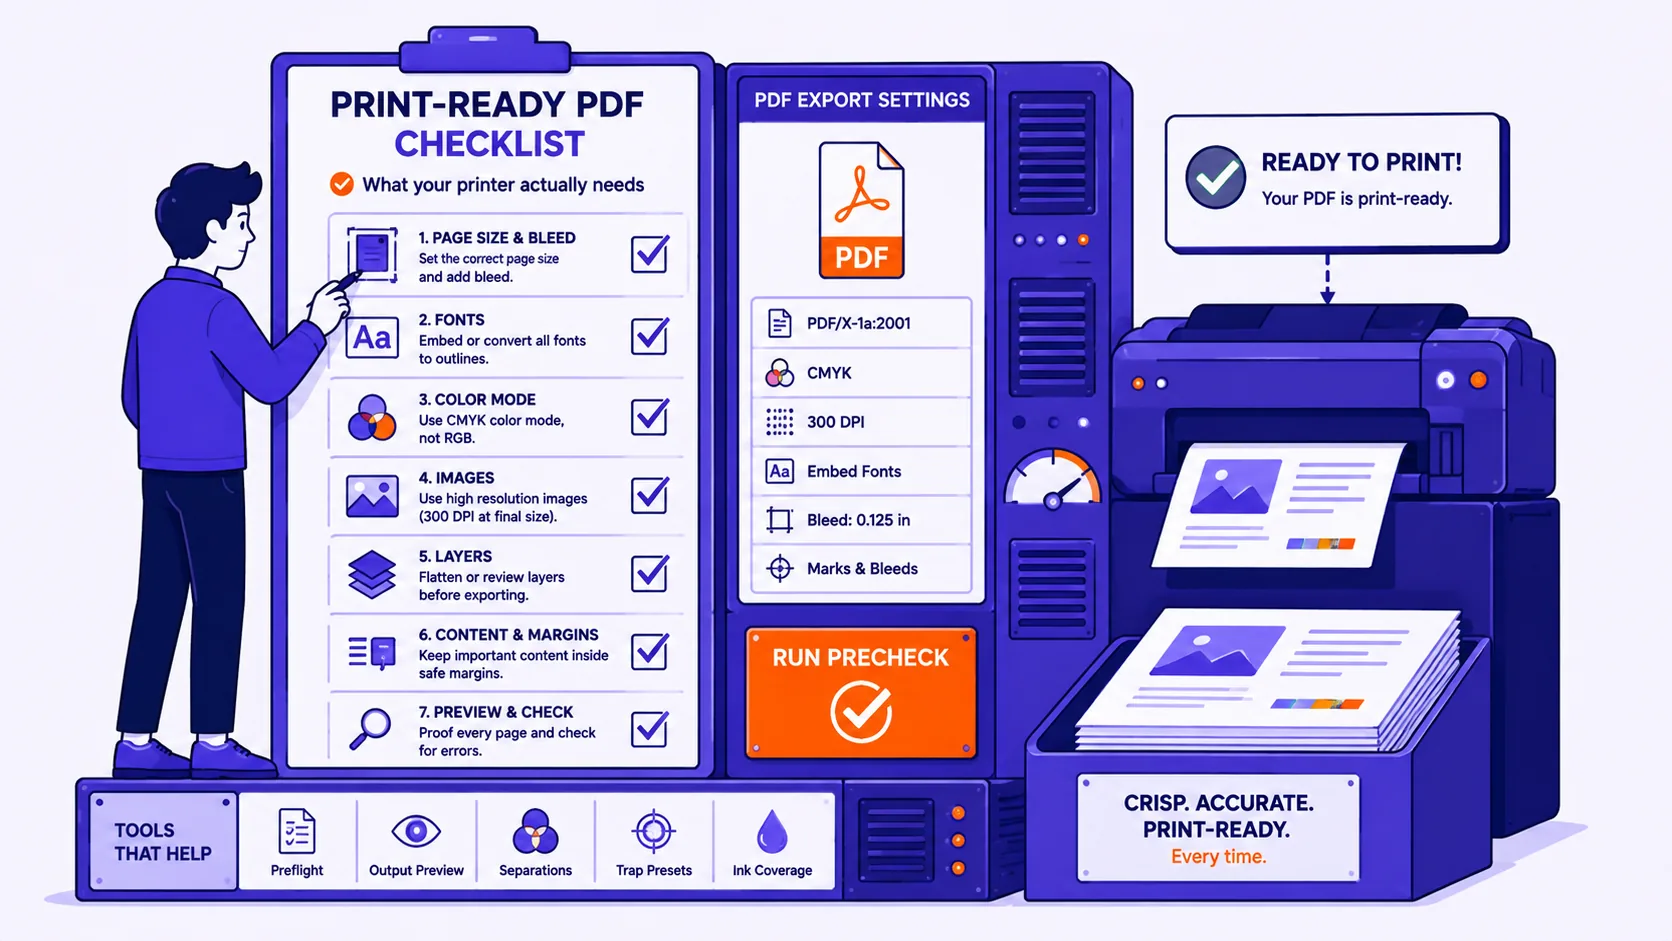
Export to PDF/X, and pick the right one
PDF/X is a family of restricted PDF profiles defined by ISO 15930. Each strips out what breaks on press and requires an output intent: an ICC profile naming the intended printing condition. They differ mainly in colour and transparency, as the PDF Association sets out:
| Profile | ISO part | Base PDF | Colour allowed | Live transparency |
|---|---|---|---|---|
| PDF/X-1a | 15930-1 (2001), -4 (2003) | 1.3 / 1.4 | CMYK, greyscale, spot only | No, must be flattened |
| PDF/X-3 | 15930-3 (2002), -6 (2003) | 1.3 / 1.4 | Adds RGB, Lab, ICC-based | No, must be flattened |
| PDF/X-4 | 15930-7 (2010) | 1.6 | Same as X-3 | Yes |
Those parts are catalogued by the Library of Congress, which confirms two rules holding across all of them: fonts must be embedded, fully or as a subset, and page boxes defined explicitly, with the BleedBox outside the TrimBox.
Ask your printer which one they want. With no preference, send PDF/X-4: transparency stays live, so the RIP flattens it once at output resolution instead of your design app flattening it early and badly. PDF/X-1a is the safe choice for a workflow you do not trust, everything is already CMYK and flattened, so there is nothing left to fix.
Bleed: 3mm or 0.125in on every edge
Bleed is artwork extended past the trim line so a slightly off cut lands on ink rather than paper. It exists because of the guillotine: presses print many items onto a large sheet and cut the stack, and as Solopress puts it, "it's impossible to cut precisely down to the millimetre", 3mm is the margin for error they work to.
VistaPrint quotes the same figure in imperial: "the bleed line is commonly 0.125 inches (3mm) beyond the trim line," and Ironmark also specifies ⅛". Large-format often wants more.
Bleed must be real artwork, not the background stretched at export, a photo has to actually extend into the zone. Set it up before you export; adding it afterwards means scaling the page and losing your trim size.
The safe margin for text
Keep text at least 3mm inside the trim line, for the same tolerance reason. Solopress warns that "anything within 3mm of the trim line is at risk of getting cut off," and Paperlust specifies 3mm inside trim on every edge. An A5 flyer at 148 × 210mm therefore has a 154 × 216mm bleed size and a 142 × 204mm live area.
Crop and registration marks
Turn on crop marks so finishing knows where the trim is, with the offset at least equal to the bleed, marks sitting inside the bleed print on the job. Registration marks let the press operator confirm the separations line up. Most printers accept marks on or off, since a PDF/X file carries the trim geometry anyway; include them unless told otherwise.
CMYK, RGB and spot colours
Presses print CMYK ink. An RGB image gets converted on the way, and any colour outside the CMYK gamut is pulled to the nearest printable one, bright oranges dull, saturated blues shift purple, screen greens flatten. Convert deliberately, with a profile matching the printing condition, not by letting an unknown RIP guess.
Spot colours are a separate ink mixed to a Pantone recipe, on its own plate. Use one when a brand colour must be identical across runs, or is outside CMYK, metallics and fluorescents cannot be built from four process inks. PrintNinja is blunt about the trade-off: spot colours "always add substantial cost," since each needs its own plate, setup and press run. The failure mode is the accidental one, a stray swatch adds a fifth plate and a fifth invoice line. Open the separations preview and confirm the plates match what you ordered.
Total ink limit and rich black
Total ink coverage is the sum of C+M+Y+K in the heaviest area. Too much will not dry, and sets off onto the sheet above. Prepressure's figures:
| Condition | Total ink limit |
|---|---|
| Sheetfed offset, coated | 320–340% |
| Heatset web offset (magazines) | 300–320% |
| SWOP | 300% |
| Non-heatset web, uncoated (newsprint) | 240–260% |
A rich black of 60C 40M 40Y 100K totals 240% and stays inside all of these. Use it for large solid areas, where 100% K alone looks washed out.
Do not use rich black for body text: four plates at 9pt show registration fringing on every letter. Body text is 100% K, one plate, always.
Resolution is measured at placed size
This is the one people miss. A 300dpi requirement means 300 pixels per inch at the size the image appears on the page, not the number in the file's metadata. Paperlust's spec says it directly: "minimum 300dpi at final placement size."
A 1200 × 800px photo placed 100mm wide occupies 100 ÷ 25.4 = 3.94in, so its effective resolution is 1200 ÷ 3.94 = 305dpi. Fine. Scale that same image to fill 200mm and you get 1200 ÷ 7.87 = 152dpi. The file did not change; the print did.
In InDesign this is Effective PPI in the Links panel, check that, not Photoshop's Image Size dialog. Upsampling does not help: resampling 152dpi to 300 invents pixels, it does not recover detail.
Fonts must be embedded
"The printer has the font" is not a plan. They may have a different version, a different cut of the same name, or no licence, each reflows your text silently. PDF/X requires embedding, so a valid export solves it. Verify in Acrobat under File > Properties > Fonts: every entry should read Embedded or Embedded Subset. Outlining type is a fallback, not a default; it kills text search.
Transparency flattening and overprint
Export to PDF/X-1a or X-3 and every drop shadow, blend mode and transparent object is flattened. Flattening slices artwork into opaque pieces, and text crossing a flattened region can end up as an image. PDF/X-4 avoids this by leaving transparency live.
Overprint is the trap. An object set to overprint prints on top of what is beneath instead of knocking a hole in it. White set to overprint has nothing to print, white is the absence of ink, so it vanishes on press while looking perfect on screen. Check it in Acrobat under Print Production > Output Preview with Simulate Overprint enabled. Ten seconds, and it catches a reprint.
Page size, orientation and single pages
The PDF page must equal the finished trim size plus bleed, with the TrimBox set to the finished size. A "close enough" page, A4 artwork for a job that is actually 200 × 280mm, gets scaled or rejected. A landscape page rotated with a flag rather than laid out landscape risks that flag being ignored.
For booklets, supply single consecutive pages, not reader spreads, unless the printer asks otherwise. Send spreads and either they take them apart by hand or your cover ends up in the middle. Include every page, blanks included, so the count matches the finished piece.
One note on compression
Do not compress a print PDF the way you would compress an email attachment. Downsampling images and re-encoding to low-quality JPEG is exactly what a press file must not have, and printers accept large files without complaint. Compression belongs to the other copy, the version you email the client for sign-off. Make that separately with Qikks Compress PDF and leave the press file untouched.
The pre-flight checklist
- Document at finished trim size, 3mm (0.125in) bleed on all four edges.
- Background artwork actually extends into the bleed.
- Text at least 3mm inside the trim line.
- Every image checked for effective resolution at placed size, 300dpi minimum.
- Colour mode CMYK; no unintended RGB images or swatches.
- Separations preview shows exactly the plates you ordered.
- Body text 100% K; rich black only for large solids, under the stock's ink limit.
- Output Preview with Simulate Overprint on, nothing vanishes.
- Export to the PDF/X version the printer named, or PDF/X-4 by default.
- Crop marks on, offset at least equal to the bleed.
- File > Properties > Fonts: everything Embedded or Embedded Subset.
- Booklets as single pages, all pages present, correct count.
- Read the exported PDF once at 100%, page by page, before uploading.
If the file comes back rejected
Ask for the preflight report. Every printer runs an automated check and can send you the actual error list, which beats a one-line email.
Fix the problem in the source document, not the PDF. Patching in Acrobat works for a typo, not for missing bleed, wrong colour space or low-resolution images: the data is not there.
Re-export with the same preset, rename with a version number rather than overwriting, and say what you changed. If the same error returns twice, ask the printer for their export preset, most will send a .joboptions file that removes the guesswork for good.